

Connecting Contact Form 7 with Mailcoach allows you to automatically capture form submissions and add them to your email lists in real time. Using CF7 to Any API, you can do this without writing a single line of code.
With CF7 to Any API, you can connect Contact Form 7 to Mailcoach in just a few minutes and start syncing leads to your email lists in real time.
Below is a simple, step-by-step guide to get you started.
Step 1: Log in to Your Mailcoach Account
Start by logging into your Mailcoach dashboard.
You’ll need access to your lists and API settings to complete the integration.
Step 2: Create a New List in Mailcoach
Once logged in:
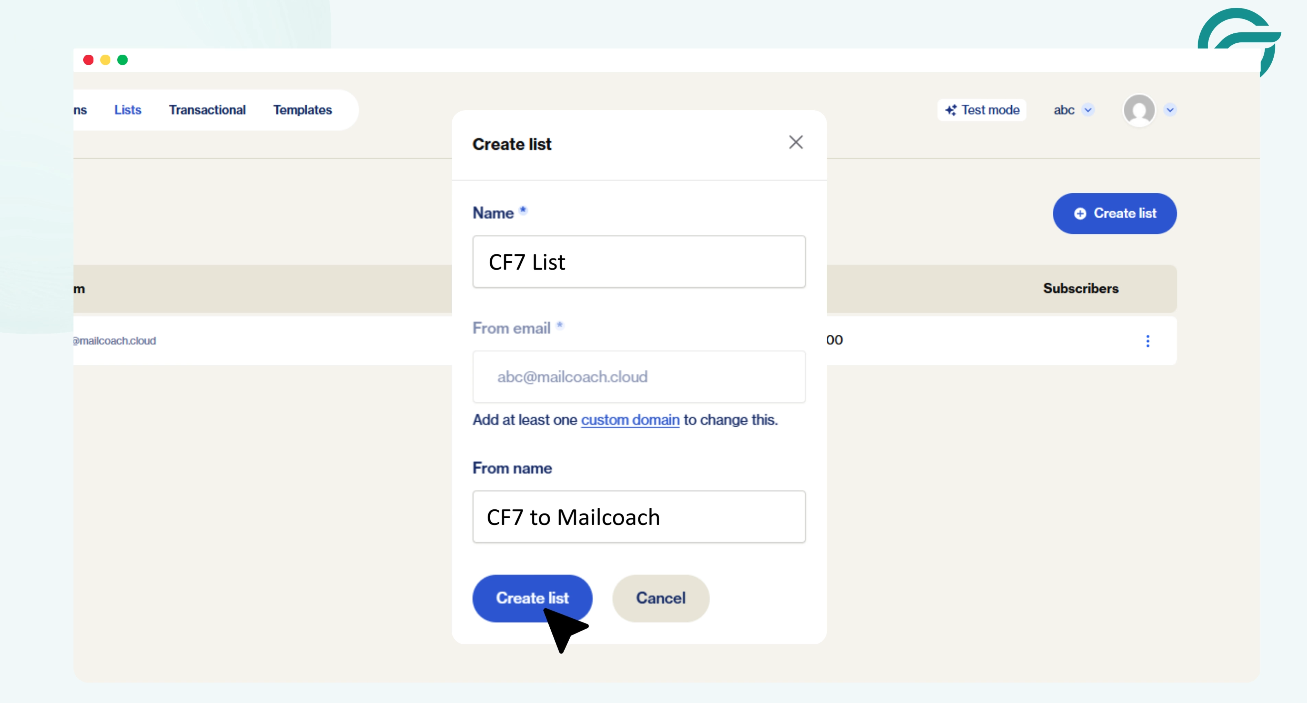
- Go to Lists
- Click Create New List
- Give your list a clear name (for example: Website Leads or Contact Form Subscribers)
- Save the list
This list will act as the destination where all Contact Form 7 submissions will be stored. Keeping a dedicated list for website forms helps you manage and segment subscribers more effectively.
Step 3: Copy the Mailcoach API URL
After creating the list:
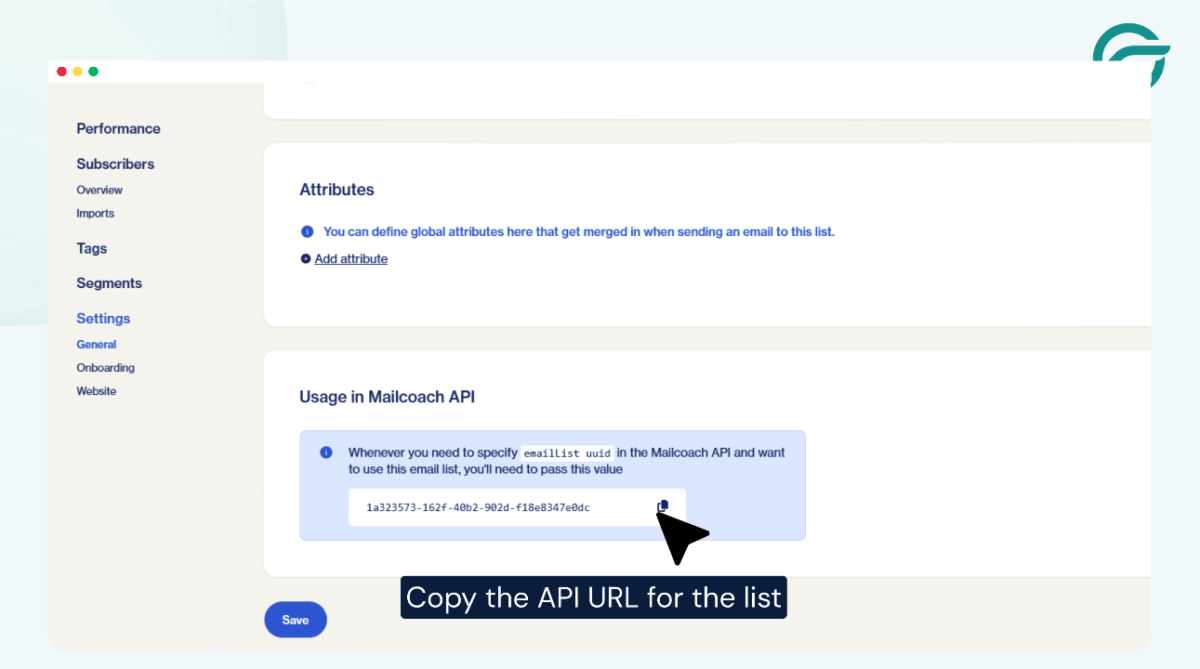
- Open the list you just created
- Locate the API URL for that list
- Copy the URL
This API endpoint is where Contact Form 7 data will be sent. Once the list is created, Mailcoach provides an API endpoint URL for that specific list. This URL tells Contact Form 7 to Any API exactly where to send the form data. Copy this URL carefully, as it is a key part of the connection.
Step 4: Open CF7 to Any API in WordPress
Now switch to your WordPress dashboard:
- Go to CF7 to Any API
- Click Add New Integration
This is where you’ll configure the Mailcoach connection.
Step 5: Give Your Integration a Title
Add a clear and recognizable title, such as: Contact Form 7 → Mailcoach Integration
This helps you manage multiple integrations easily in the future. This is mainly for internal reference and makes it easier to identify and manage integrations, especially if you connect multiple forms or APIs later.
Step 6: Paste the Mailcoach API Endpoint
In the API Endpoint URL field:
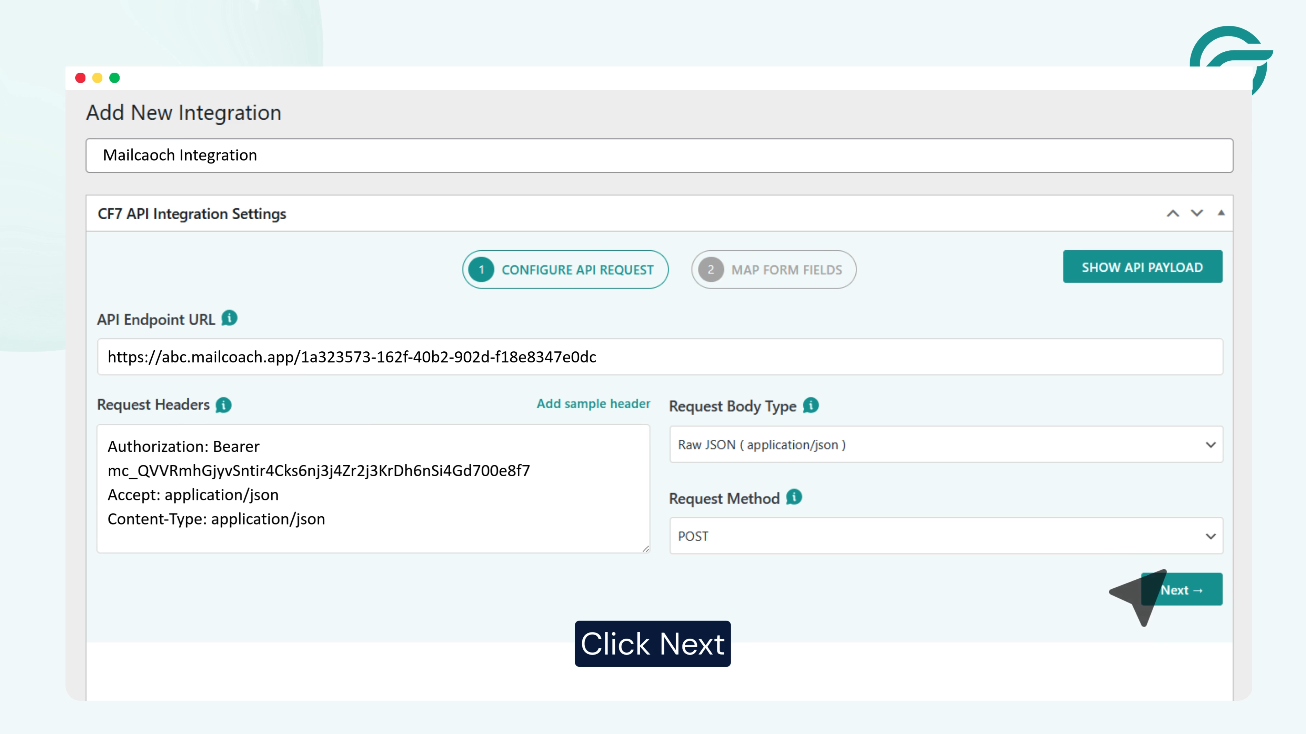
- Paste the Mailcoach API URL you copied earlier
- Double-check the URL to avoid any mistakes
This ensures that every form submission is sent directly to your chosen Mailcoach list.
Step 7: Add Required Headers from Mailcoach
Mailcoach requires specific headers for API requests.
To find them:
- Go to Mailcoach → Documentation
- Copy the required header format
Then in CF7 to Any API:
Paste the header details into the Headers section
Step 8: Create and Add an API Token
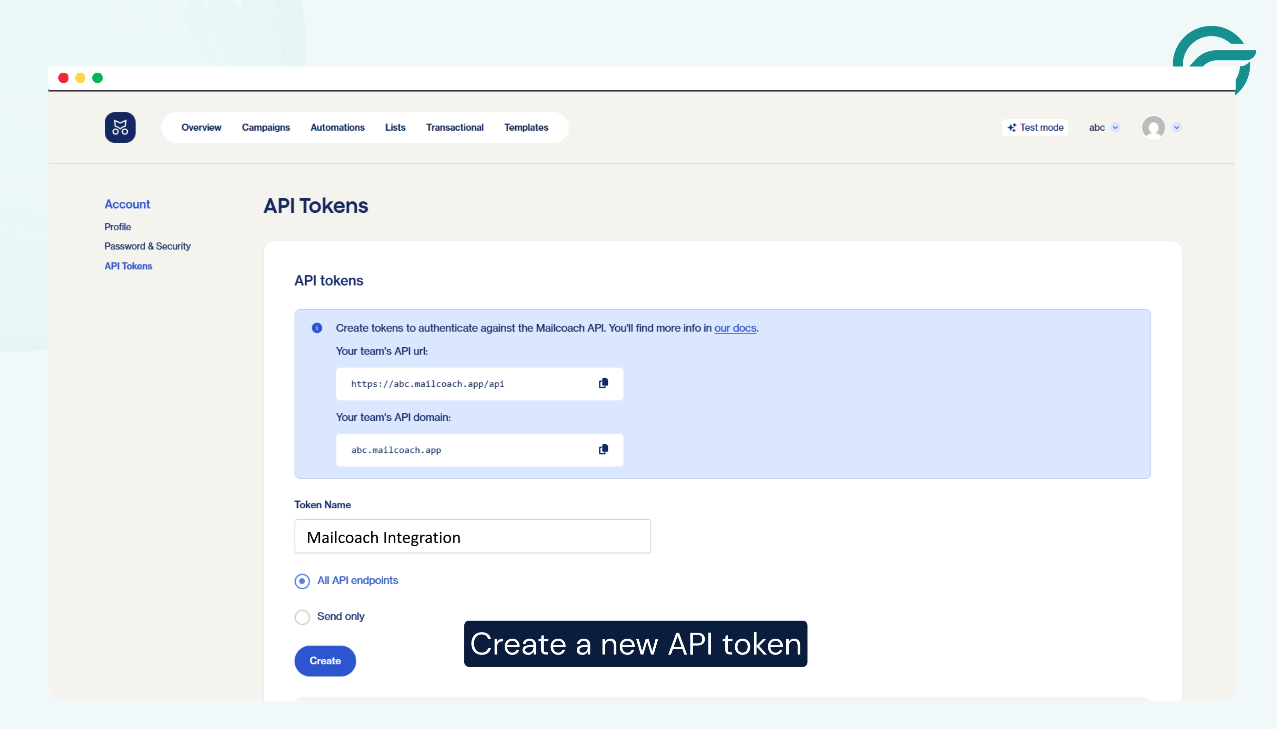
- Go to Mailcoach → Profile → API Tokens
- Click Create New API Token
- Copy the generated token
Now return to WordPress and paste the token into the Authorization field in CF7 to Any API
Step 9: Select Your Contact Form 7 Form
Click Next and:
- Choose the Contact Form 7 form you want to connect
- Select the Mailcoach list you created earlier
This links your form submissions directly to the correct list. This step defines which form’s submissions should be sent to Mailcoach.
Step 10: Match Form Fields with Mailcoach Fields
Before saving:
- Cross-check your Contact Form 7 fields (name, email, etc.)
- Make sure they match the fields in your Mailcoach list
Correct field mapping ensures data is sent accurately.
Step 11: Save the Integration
Once everything is set:
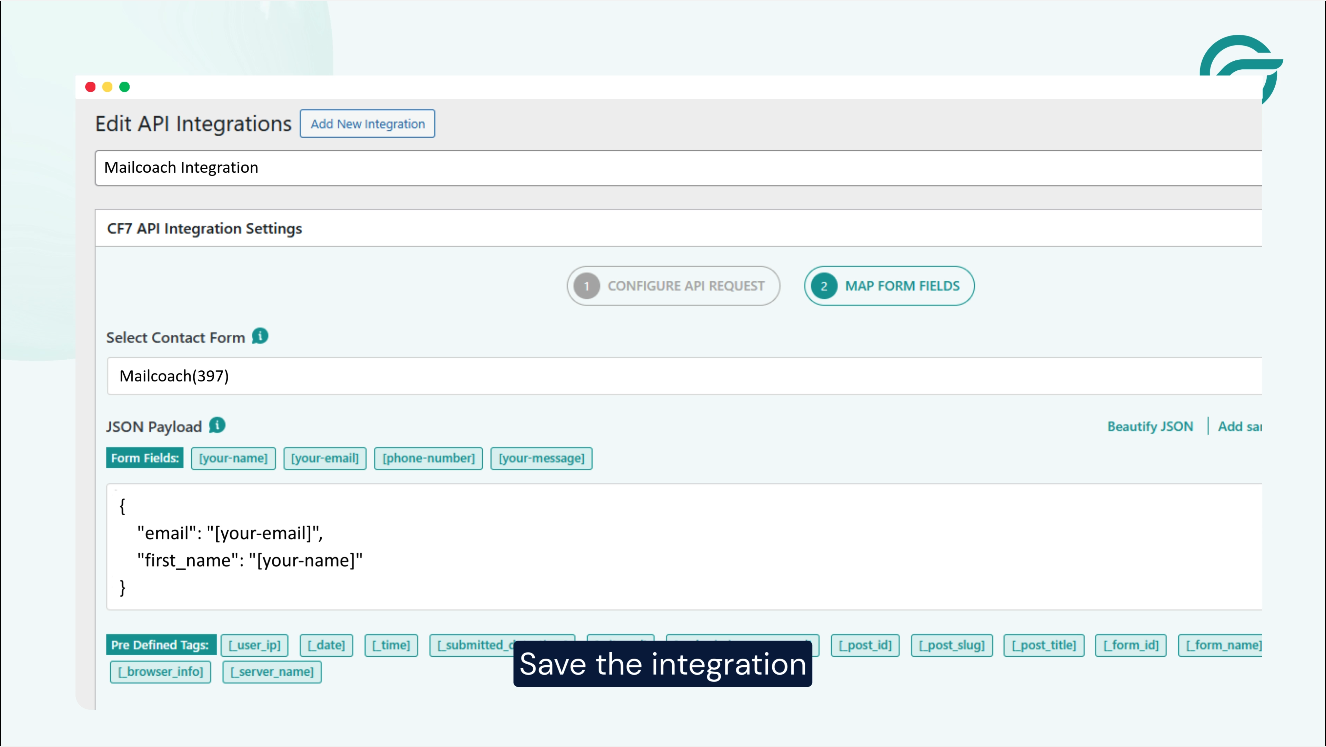
- Click Save
- Your integration is now active
Your integration is now active, and new form submissions will be processed automatically.
Step 12: Submit Test Entry and Verify the Request Using API Logs Inside WordPress
To confirm everything is working:
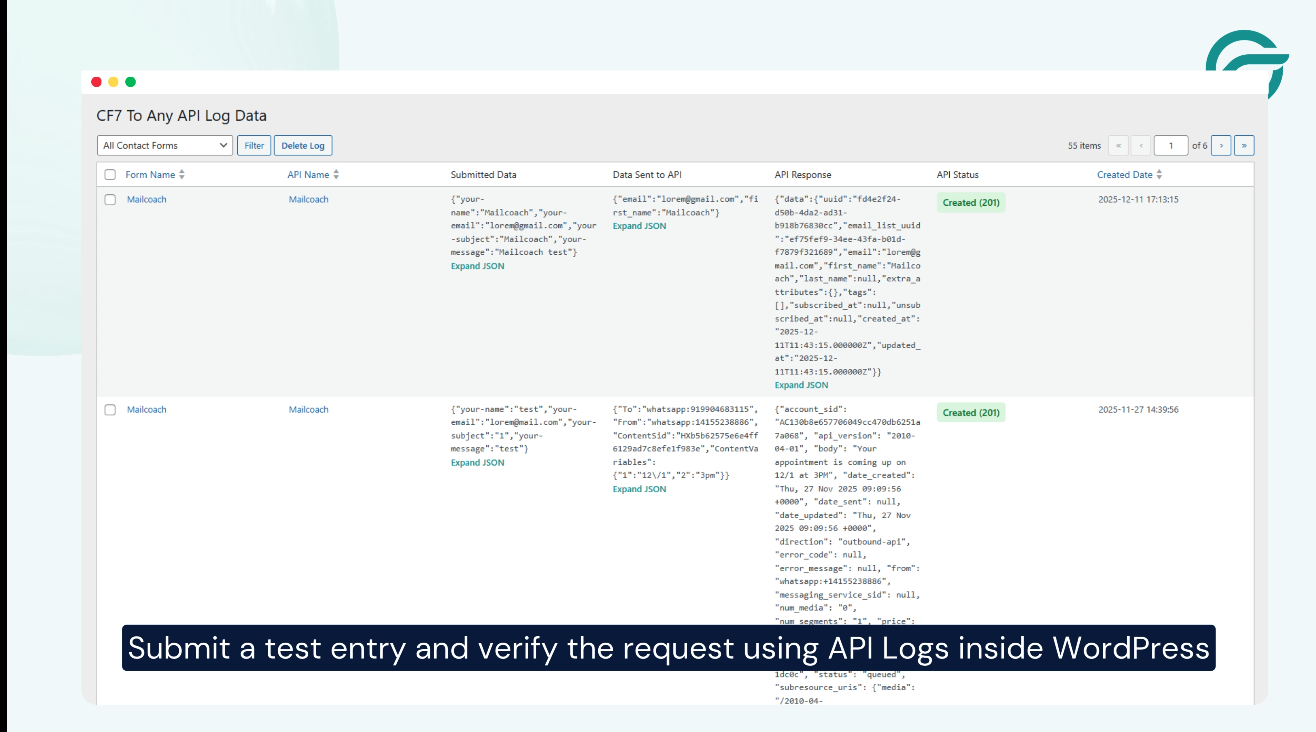
- Submit a test entry through your Contact Form 7 form
- Go to CF7 to Any API → API Logs in WordPress
- Verify that the request was sent successfully
- Check your Mailcoach list to confirm the subscriber appears
Final Thoughts
With Contact Form 7 to Any API, connecting your CF7 form to Mailcoach takes only minutes. No custom code, no external automation tools, just a simple, reliable way to send form submissions directly to your Mailcoach lists and keep your email marketing running smoothly.
If you want full control over payloads, headers, and custom API requests, CF7 to Any API makes it simple, fast, and flexible.
